
Vernier Mini GCs
These are the newer GCs used in the organic labs. They are much simpler and more reliable and use ambient air as a carrier gas, instead of helium. However, they cannot detect as wide a range of compounds as the Gow-Macs. The detectors in the Mini GCs are chemicapacitance-based. In this system, when a compound passes through the detector membrane, the electrical properties of this membrane change in a detectable way. The compounds that can be detected by this unit are listed below. Note that alkanes and alkenes are not detectable, since they do not change the capacitance of the detector enough.
| Compound Type | Typical Compound | Boiling Points |
| Alcohols | C1 – C8 | 65 – 195°C |
| Aldehydes | C2 – C8 | 20 – 170°C |
| Aromatic hydrocarbons | C6 – C10 | 80 – 165°C |
| Carboxylic Acids | C1 – C4 | 100 – 165°C |
| Esters | C2 – C10 | 30 – 120°C |
| Ethers | C4 – C8 | 35 – 145°C |
| Ketones | C3 – C8 | 55 – 175°C |
Procedure for Using the Vernier Mini GCs
The needles used in the Vernier Mini GCs are slightly different from those used for the Gow-Macs. A much smaller volume of liquid is injected (0.2µL), so the syringe has a very fine wire that travels down through the needle to expel all of the liquid from the tip. The plunger has a black bar to let you see how far it is withdrawn, but you will not see any liquid within the syringe.
The syringe is fragile. Be careful not to bend the needle or the plunger. Never pull the plunger back more than 50% of its total volume. Be careful not to bend the plunger as you press it down. If the plunger is accidentally pulled out of the glass barrel, reinserting it is extremely difficult or impossible. Each needle has a plastic spacer so that it cannot be inserted too far into the GC. Do not remove this spacer.
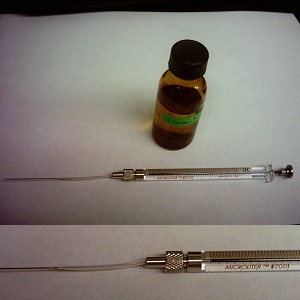 |
A 1µL glass Hamilton syringe is used to inject the GC samples. Place the tip of the needle in the liquid. Slowly draw up a small amount of liquid by raising the plunger, then press on the plunger to expel the liquid back into the liquid. This serves to rinse the syringe with your sample, ensuring that what you will measure in the GC run is the composition of your mixture. Repeat the rinse process one or two times. Then, draw up the plunger slowly again while the needle is in the liquid and carefully fill the syringe with liquid to the 0.2 mark. |
 |
Open the Logger Pro software on the attached laptop (the icon looks like a sheet of graph paper). Choose New from the File menu. Click Collect. Set the Temperature-Pressure values to the values specified in the experiment you are performing. Select Done to initiate the Mini GC warm up. A new message will appear, "Do not inject until GC is ready", and the LED on the Mini GC will be red. The Mini GC will take a few minutes to warm up and stabilize. |
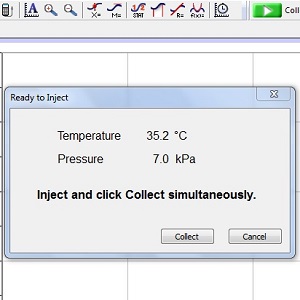 |
When the Mini GC has reached the correct start temperature and pressure, the message reads, "Ready to Inject," and the LED on the Mini GC is green. |
 |
To insert the needle of the syringe into the injection port of the Mini GC, hold the syringe with one hand and steady the needle with your other hand. Insert the needle into the injection port until the plastic spacer is resting against the port. If the needle sticks, rotate it slightly while inserting. Simultaneously depress the syringe plunger and select Collect to begin data collection. Pull the needle out of the injection port immediately. |
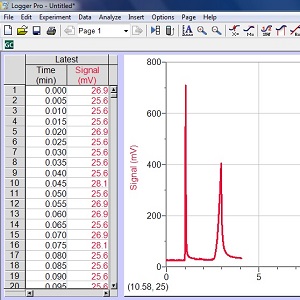 |
Once all your peaks have shown up, you can end data collection by clicking Stop. |
 |
Choose Peak Integration from the Analyze menu. Select and integrate the left-most peak. To do this, drag from a little before the peak to a little after the peak. Then choose Add to record the retention time and the peak area in your data table. Enter the name of the compound, if known. Repeat for each peak, then select OK. Print your spectrum. |
Back to Gas Chromatography